OK, Woodworking People, I Need Some Help
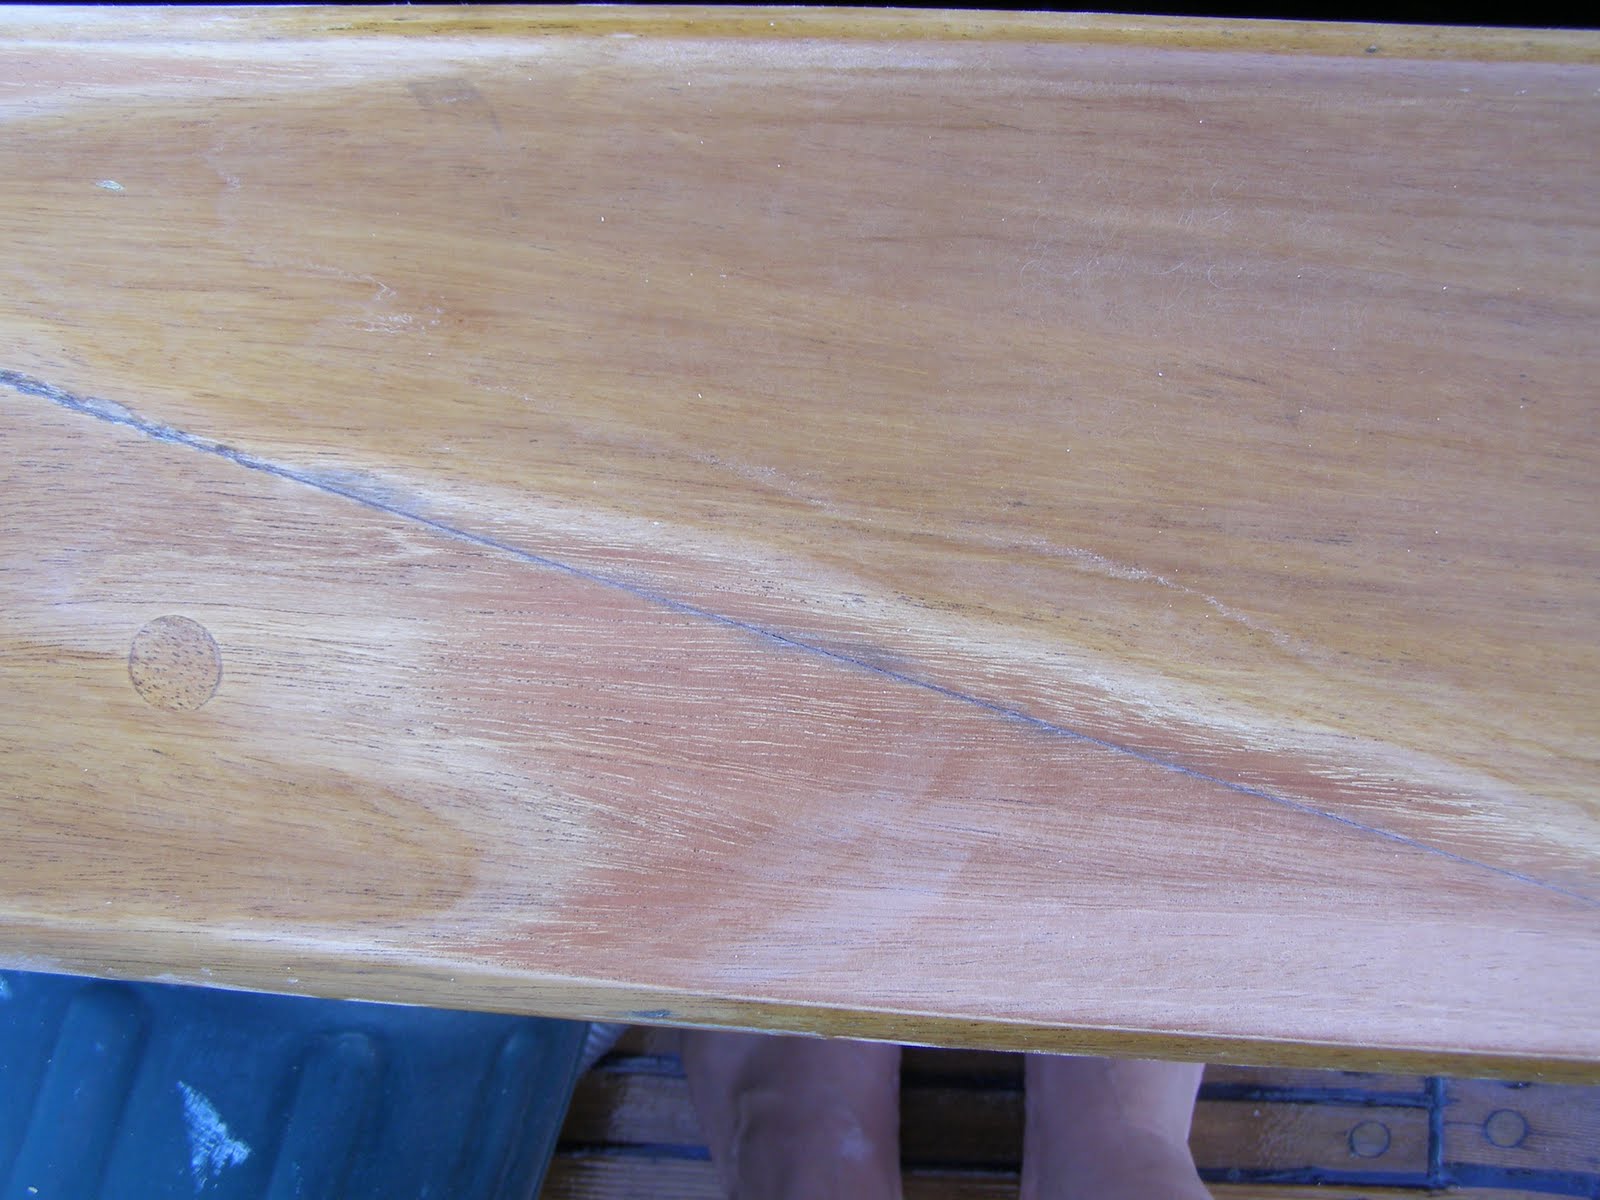
It’s time for some annual varnish and we’ve been taking it down a bit more to bare wood. The caprail is made of Honduras mahogany. Previously I’ve been able to get away with just a light sanding and a topcoat of varnish. But in several spots, we’ve needed to get down to the wood itself.
And there’s my problem. Wherever we sand, the amber color (the varnish) disappears and is replaced by a darker reddish color (on the left in the above photo – the natural color of the wood). Either of which would be fine, but the combination of patchwork colors is completely unacceptable.
So my questions are:
1.) Why is this happening?
2.) How did they get it to the golden amber color?
3.) Am I going to have to take the whole frippin’ thing down to wood and live with a reddish caprail from here forward?
The ideas we’ve kicked around tonight have ranged from chemical strippers to heat guns (Brock doesn’t think I have the patience for that, but if it works without sacrificing any wood, he might be surprised). I’ve read Wittman, who deplores sanding more than anything when doing brightwork and I can be a disciple and learn to heat/scrape.
Anybody out there understand WHY my mahogany is going red on me? Is that it’s natural color? It would probably be spectacular that way as well (I love my dark cherry floors, after all). But I just don’t get it.
****More research later…OK, so apparently Honduras mahogany is naturally a “coppery-brown” reddish wood. I still can’t figure out how they got it blonde. A stain? I do like the blonde look, but don’t want the “blonde-russet patchwork quilt after years of varnish repairs” which was described by some folks. Russet OR blonde. Not both.
Meanwhile, Brock has acquired both heat gun/scraper and a gallon of chemical stripper. Evidently, we each get a five-foot section and we’ll “race” to see who gets done first. I may have to remind him that the quality of the job matters as well. There’s little doubt in my mind that chemicals will be faster.
++++ Later again…ooooh, my new very favorite friend ~ the heat gun! Wow, that was truly awesome, the varnish just came right off of her sweet and easy. And for all of the detail areas (window frames, etc), well, I’m never going back to any other lame techniques. That is much too easy (no dripping of chemicals, blowing of sawdust)! I’m thinking the mahogany is just going to be darker than it was. Which is fine with me as long as it’s consistent. Should actually be quite lovely, I think. But HOW DID THEY GET IT BLONDE IN THE FIRST PLACE???

As others have said, its a combination of a light stain and UV bleaching. Your best bet is to strip it all and refinish, which it seems that you are doing.
The light colour is a combination of the oxidation of te wood, and UV breakdown of any varnish, etc. you put on top (the wood would also potentially lighten due to lighth= reactions.When e have issues like this in the metals end of the planet, we use a 'planarizer. Much bigger, much wider than normal grinding, but we could take it to dead flat, removing mill stain, weathering, and surface impurities…not sure if there's a similar tool for wood–I know there's not goint to be the automatic, big-ass cylinder model we use for pieces at least as hard as steel, and at least 3-4" thick.
Geek, Squeek, Gwwk, Doh! I think you are right. Oh yea! thats right my bathing platform and rear access steps from it I had forgotten thanks for reminding me :o)) I`ll save them for you :o)) Tee Hee the boats out of the water for a week in September for a full bottom job (like KJ had recently) I`m hoping to fit an electronic home built antifoul system to her at the same time Maybe, possibly, if I get the design right :o(( gosh the boat bottom looks so big out of the water and there is only little (not so little) me to do all the work :o(( Tee Hee.
Rob, dude. You've totally geeked out on this one! And wasn't i supposed to be helping you with some sanding project or something? xo to all, LL
We had a similar problem on our 1979 CSY sailboat. We never could match the cetol finish the previous owners put on the wood.We tried just the same steps you are trying and the big winner was the heat gun and a scraper. The Chemicals only worked so well and they also ate away the topsides paint if you got any stripper on it- so now we had two jobs. Strip the teak and touch up the topsides paint!The mahogany will bleach out with the sun, but when you sand/scrape the mahogany down the natural color shows back up.The Florida/Georgia sun gets awfully hot and we'd have to do brightwork every 6 months.Our new/used boat has significantly less teak:)-JC McDowell and the Family Unit
Oh! watch he heat gun on the glass as it can crack it! with prolonged use :o(( Hondurus mahogany is my favourite mahogany and very expensive. I would be tempted to strip it back and re coat it with as many coats of clear varnish as possible. however it will go back to the teak colour with the suns rays on it each day but it will take a while the rust matks are probably nails or pins and can be treated with a strong alkali? like a paste oven cleaner use a small plastic spatula to position it only on the rust mark having punched the nails further in and retouch the area around it, if needed, with a mahogany stain also use a wood filler to fill any remaining holes to match.
Hi Jamie! the red is the natural colour of the wood, (you are right) and the many coats on top are varnish of various kinds which have been either treated by the UV light ( most probably) or were mixed with a stain to give it a teak colour ( which it looks like it is now) so buy a compatible small pot of teak or light oak stain for a few dollars and mix your own teak coloured varnish and spot "Prime the red areas to match? maybe get a quick drying (spirit) exterior or preferably marine varnish, just for the touch up. feather the existing edge much the same way as with a gel coat repair and "plonk" on as many coats as you need to obtain the same colour. The mixing isn`t rocket science. Using a small amount of varnish say one capful. mix a half a capful of say teak stain and see what colour it turns out to be and so on until you have the right colour. Don`t start off using the whole of the varnish as you will make it too dark and won`t be able to get it to lighten (Obviously)when you have about six coats of coloured varnish ( the reason for the quick drying version) on the red bits and you are happy that they are the correct/same colour, then gently rub them ( all the patches )down (with light "wet and dry" paper) to match the existing varnish (taking out any ridges and brush strokes) and then lightly sand the whole of the rail and cover it all with the same varnish and stain mix, or not, whatever you wish to do (you might just wish to use a clear varnish? Your alternative is to use say a paint stripper ( nitromors) and scraper to remove the whole lot and start over again. its not dificult and the proper way to go really, but I would try the easiest way first. I don`t believe in reducing any surface coats unless its necessary and thats why I say repair the bits and treat the whole with even more protective coats. B,O,L, Rob